Sunday, 2 July 2017

Yoga Forest - San Marcos, Lake Attilan

Take a walk from the docks through the cozy cobblestone walking streets of San Marcos into the valley and through the trees. Follow the signs that point you on your way to The Yoga Forest. Here you’ll find yourself staring up the cliff walls of the valley and wondering to yourself what kind of lucky people are occupying the little huts sitting amongst the lush forest jungle. This is one of the longest lasting and highest quality yoga practice and study centers around Lake Atitlan - and it is a little paradise. 
I was not here to downward any dogs or salute any suns - I came to check out the gardens. The Yoga Forest was desinged with the Permaculture principles in mind and has recently employed a very permaculture passionate woman named Kat from the UK to make sure some of the designs are fixed up and used to their maximum potential.
The first thing that caught my eye were these smartly designed yurt like tent. They seemed like a very comofrtable temporary structure that is mobile and easily placed anywhere and can accommodate very tall people like myself. Having a temporary residence comes in handy when designing new pieces of land. 
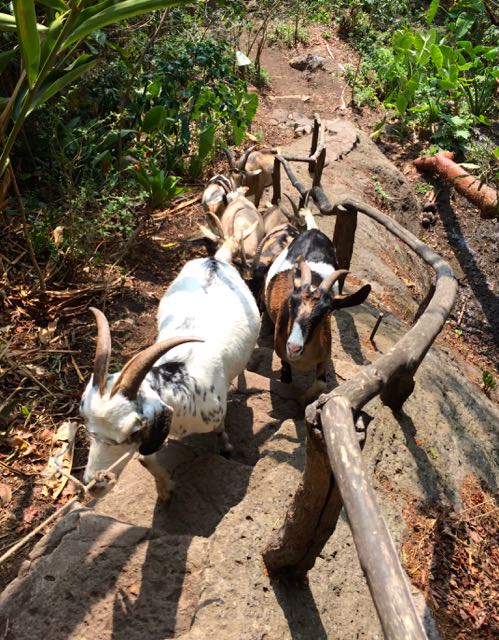
Here are some happy and healthy looking goats coming back from their morning stroll. Yoga Forest sells their own goat milk and cheese which is also used generously on the pizzas from their wood fire oven. Tuesday nights is all you can eat pizza where visitors and guests get together to make their own pizzas until they run out of ingredients. Pro tip - the tastiest pies come out towards the end!
   
Ducks take care that the ponds and streams remain well manicured. Duck eggs can also be a nice treat. Above is the main pond/garden water resevioir. It’s just been newly fixed up and Kat has plans to plant tumeric, water cress and more water lilies in and along the banks. The pond is constatly fed by mountain spring water and is equipted with spill way pipes leading to the gardens and throughout the property. 
Before we get to the gardens it’s worth mentioning that they are supported by a large and comfortable to work in nursery stocked with all kinds of leafy greens, fruit tree starters and it even looks like they are cultivating orchid flowers.

The first thing I noticed was how thickly mulched the gardens were. It’s the dry season so it is important to keep direct sunlight off the soil and lock in moisture wherever possible. The mulching effort is rewarded when you look at the dark rich soil underneath. This may turn some people away but it’s worth mentioning that the soil here is supported by a large amount of humanure provided by the many guests of the Yoga Forest. It seems like most of them are the veggie natural food types which makes for the perfect fertalizer. For those of you who are squimish you should understand that this is fully broken down biomass and any harmful or icky bacterial is long decomposed. 
Here is a young garden bed amongst terraces built on contour. Some of the beds are shaded by a trellis which can house an abundance of vining food plants with my favourite being passion fruit. Kat explained to me that the drastic weather differences between the dry season from fall through winter and the wet season in the spring and summer make it challenging to preserve the land. Heavy rains easily flood and wash out terraced garden beds and being on a steep slope makes the soil dry out quickly. For this they have come up with an interesting solution that starts with managing the flow of water through the land.  
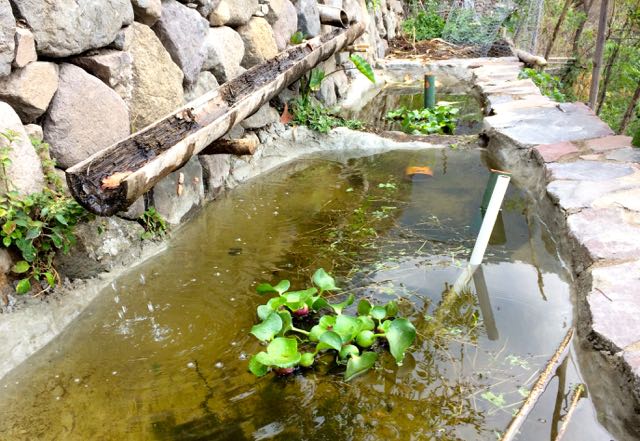
At the top of the terraces they have placed a variety of smaller pools which are fed from the main pond. In here they have a kind of aquaponic system where talipia fish are farmed in the water that feeds the gardens. The fish naturally add nutrients to the water which is gobbled up by the vegetable gardens. The fish can also be eaten when they get big enough but make sure each fish pond has some water plants for shade and oxygen and that they are not too deep or cool as talipia like temperate water. Other life can be encouraged to grow in the ponds like giant snails which can be eaten in a stew (if you really want) and their shells can be ground up and used as added nutrients in animal feed. 
Let’s go through their method for preserving the garden beds through more dramatic weather. They first have dug a pit around a meter deep and a meter wide under the beds, inserted a pipe and filled the pit with gravel. The pit is then covered with soil and made into a garden. During the heavy rains the beds are ancored and the water fills the gravel pit. During the dry season the pit is kept moist by irrigating from the above ponds through the insereted pipe. This creats a wicking bed where water is sucked up by the roots and soil. Water is controled by adjustable joints along the piping. The result is a whole lot of green all year round ! 
All throughout the property you’ll find natural buildings situated with a perfect veiw of the lake. Looks like most of the building materials like large bamboo and palms came from the low lying tropical coast land.
Who needs a newspaper? There is even great veiw while you’re sitting on the toilet. 
Another nice feature is the sauna. Heated by a wood fire oven covered in rocks, this is the perfect place to relax after a long day full of 'namastays'. Aromatherapy herb and flower oil can be poured over the rocks. Wood fire saunas can be built in a number of ways and can usually double as a smoker, fire place area, oven or space heater. 
Happy goats is the sign of a healthy eco-system right? Check out the future posts where I revisit The Yoga Forest in the rainy season to see how the wicking beds held up. 

Tuesday, 2 May 2017

Scrap Wood Chicken House


We're going about building a chicken house using pretty much the same principles that these gents used to build this children's ferris wheel ride; with whatever we can find in the scrap heap!

It's only fair to start with the finished product. Voila, a super safe chicken bungalow in the hills overlooking the lake. 
When designing your chicken house there are a few things to take into consideration and one of the most important factors is location. You want it close enough to your residence to lend for easy access as it's a system you should be checking in on every day in the form of finding delicious fresh eggs and keeping your chickens safe and fed. Another factor is ease of garden access and not for your chickens to go roaming around your flower patch (they will destroy everything) but more for transportation to the garden of all the wonderful composted and nutrient rich soil they will produce for you. 

For chicken aided compost soil you have two options. One is to fence off certain areas of ground you want to fertilize and let the chickens eat, scratch and spend their days in that area for a few weeks. The other option is to have one area where they do their thing and keep adding mulch, kitchen scraps and whatever you want to compost in that area for them to scratch about and desecrate on. If it starts to get too mucky and smelly you need to add more carbon in forms like straw, ground up corn stalks, cut and dried grass or mulched leaves. To get composted soil out of this spot just simply dig down under the top layer and fill up a bag with nutrient rich earth. 

Remember, chickens left on a single plot for too long will leave the land and themselves in an unhealthy state so you either have to move to a different area (fence them off in a new spot) or make a new ground for them (add mulch to their one area). 

For this chicken set up we've chosen to keep them in one area and make the ground of that area into one large compost pile. Here is Tom taking a rest from breaking up the soil which will eventually be under the raised chicken house. 


The leader of this project was Timo who is a traveling south west French man. He told tragic tales of his chickens being murdered in the night by beasts and was not cutting any corners to build this chicken house strong and safe. We used whatever materials we could find laying around the property which included wooden posts, boards, bamboo and an old tarp plus some screws and nails. 

We first chose 4 tall posts to make the basic structure along with side panels to make the frame. The concept is to make a safe place for them to roost (sleep at night), lay eggs and be shielded from the elements. This means a raised structure with a bird access ramp and a sturdy door along with a water proof roof.


Here's Tom again who had a lot of work to do yet was caught napping on more than a few occasions. We made slits in the main posts and chiseled out grooves to hold the side panels on tightly. This is the difference between a chicken house lasting 2 years and 10 years.


Great work Tom, you finally made the sides! Here is Timo starting on the roof. We made the frame then cut an old tarp to size and folded in under the top side boards as well as nailed it down with wooden slats for a nice tight fit.


Sides on, front boards on, roofs on, backs on as well (we nailed on an old floor mat much like we did that roof tarp) and Tom's off slacking somewhere. That left Timo and I to do the sides by ourselves. We had a few large pieces of bamboo and cut them into small slats. After, we nailed them individually all along the sides and front and left space for a door. Somewhere between all that we put in a crucial part which is the roosting floor. We used long sticks spaced just enough for droppings to pass down onto the ground but still safe enough to prevent invaders from harassing the birds.


We also covered the tarp roof with canye branches which is like a softish bamboo looking grass and nailed them on tight with long slats along the top and bottom.


Here are the egg laying boxes. Be sure to put plenty of straw down and freshen it up from time to time. Put the boxes so they have a little bit of privacy and are easily accessible from the doorway.


Door went on and got beautifully painted by my good wife Raquell. A bunch of other little details got finished as well but I think you get the picture by now. Raised safe and sealed structure, place for chickens to roost and dropping to drop, boxes with straw and a bit of privacy for egg business, door near egg boxes for daily access. Also, try to make it look nice because you're going there every day.


Finished with a nice little bench to the side for observing the birds. This should be enough space for around 6 chickens. Remember the breed of your chicken will dictate the amount of eggs they are able to lay and the management of your chickens will affect the quality of the eggs. In other words, choose a good laying breed and give them some care. 


We had a few chickens donated to us and we transported them on foot over the mountain in the middle of the night after pizza at the Yoga Forest which will be the topic of my next post. Also, chickens are good. 

Sunday, 16 April 2017

Chili Sauce, Seed Saving and Super Simple Mushroom Cloning


If you can leave the world a little more beautiful than when you found it you've left a life well lived. 

Here is a painting by my lovely wife Raquell. It faces huge bay windows which look out over Lake Atitlan (yes, we are still here ... it's lovely). As you can see, some volunteers exchange a little less energy than others. 

We are going to look at a sweet mango and habanero spicy chili sauce but first, if you missed my previous post on mushroom cultivation (and a kind of crappy chili sauce), here again is the easiest, fastest and very effective way to grow mycelium from mushrooms you find or buy at the store.


 - Simply soak some egg cartons or cardboard in a bowl of 9:1 water and hydrogen peroxide. 
 - Cut off the mushroom stems and roots (that's the same as mycelium by the way)
 - Break small pieces onto the soaked material.
 - Seal it up tight in a bag. You don't want little fruit fly like bugs getting in there. 
 - Cut slits in the bag and seal it with sports tape or any micropores tape. Careful for flies!
 - Label and date the bag and leave it in a dark, humid, room temperature like place. 

Mycelium will quickly start to take over and you'll have a nice amount of fungi to inoculate a grow bag or garden. Since this isn't the most sterile way to clone mushrooms, it works best with strong, hardy strains like oysters.


Seed saving is something I should have gotten into long ago. What a fine way to collect and share the most wonderful of souvenirs (careful at borders). Above is an amazing selection of Latin American corn including one cob of a super specialized cotton candy coloured cob which was selectively bred for radical colours over the course of 20 years. I also saved seeds from some of the chilies used to make what we are going to talk about next.


Look at these beauties. On the left we have a tiny pepper whose name translates to 'bite of the dog' and I can tell you with certainty that it does indeed bite hard. From there we have an unknown pepper that was selling in bunches at the market of Santa Clara in Guatemala and it full flavoured and super spicy. I wonder how it rates on the Scoville Scale? After, there are the classic red and yellow habanero followed by the good ol' red and green jalapeño. 


We are going to make a bright coloured mango and habanero spicy sauce today. I used ripe mango, yellow habanero, carrot, onion, garlic, lime, salt, black pepper and vinegar. 


I lightly sautéed the habanero peppers, onions and garlic with a little oil on a pan to bring out the flavours. You can take some seeds and cores out of the habaneros if you're not into 'knock your socks off spicy'. At the same time I started simmering the mango and carrots in some vinegar with the the lime, salt and black pepper included as well.


Before anything in the pan starts to brown, dump it all together in the pot with the vinegar and carrots and let it all simmer together on low for about 15 mins. This does two things. First, it allows all the flavours to blend together and second, it pasteurizes the ingredients to allow for a longer shelf life. 

Let the whole thing cool down a bit before throwing it all in the blender. Liquify to your liking and add more salt to taste. Be careful to keep a lid on the blender as hot sauce splashing up in your face is gonna be a bad time. Also, if you want to wear gloves while handling the chili peppers it might be a good idea as well. My fingers were burning for a good 24 hours. 


This sauce was a total hit on just about anything and have a look at that colour! I preserved a variety of chilies in a jar of vinegar with a bay leaf and some salt and black pepper. Let's see how the flavours grow with age. If you really want to properly pasteurize your sauce for preservation you can seal the glass bottles and boil them in water for 20 mins. That should give you a shelf life of around a year if done properly. 


Finally, a farewell selfie pic with some of the good folks hanging around Fungi Academy. We're saying goodbye to Tilo who inspired me to save seeds. Many thanks good man!